Quantcast
Channel: Studio Incamminati Blog
Viewing all 103 articles
Browse latest View live

Intensive Figure Painting Workshop with JaFang Lu

$
0
0
By Lynn Snyder
Third-year Student

Week two of the Intensive workshop was taught by instructor JaFang Lu. It highlighted the fundamental skills taught in the four-year curriculum of the Advanced Fine Art Program.

Class began with a demo showing the linear stage of the painting process using the envelope method. This is an outside guide for forming the outer shapes, major thrust of the head, rib cage, hips and legs. Shadow shapes are added to further articulate the form by squinting and keeping the shapes simple. The tone of the canvas represents the light mass in the painting called open grisaille. The students did several poses incorporating these concepts into the beginning stages of the painting.

10-Minute Demo

Building on the previous step, a limited palette was used to mix a warm flesh tone to represent the middle tones of the light. JaFang mixed a dark light value to cover the gray tone in the light areas. A dark accent and highlight were established to obtain the value range.  

  20-Minute Demo

The next two demos showed how to use the thickness of the paint and white to get deeper values for a broader value range.

40-Minute Demo

40-Minute Demo

After two days of using a limited palette, JaFang introduced color to the figure. The first pass of color is the intuitive choice based on the one that's easiest to see in the light, moving on to the easiest to see in the shadow.  

20-Minute Demo

JaFang painted alongside of us for the longer pose. As she went through each stage of the painting, she'd announce she was moving forward and we were able to watch as needed. Some students watched while others painted along. It was amazing to see her get so far in the painting with a clear effect of light in such a short time. We all came away with a working approach to building a painting. Great experience!  

60-Minute Demo

Student Work


Week Two Intensive Painting Workshop - Group Demo

$
0
0
By Lynn Snyder
Third-year Student

During the Intensive Painting workshop, JaFang Lu and Lea Colie Wight demoed for three and a half hours on Wednesday evening. Step photos were taken at each pose break showing their approach to building a painting.  It was treat to see the beauty of the figure emerge. 


JaFang Lu's Demo


Lea Colie Wight's Demo

Photos were taken with an iPhone. 

Form Painting Workshop with Darren and Steve

$
0
0
by Wendy Wagner
Third-year Student

From Brazil to California, artists from all over came to study with Steve Early and Darren Kingsley at their popular Form Painting workshop.

It is basically a year of our Level Two class condensed into one week. We started with gestures + block-in's, before moving into a four-day pose. Darren and Steve would demo in the morning  and we would paint when they finished.
gestures and block-in's
There isn't nearly enough space to abbreviate all of the information given (you will have to take it for yourself sometime), but here is a visual synopsis.

Steve talking to students about his work
Darren explaining his process to a student
 Keep in mind that these photos were taken quickly with an iPhone. During model breaks, students would ask questions, and there would be a line for pictures. This is the last workshop for Steve as a regular instructor here, as he is moving to California. However, he has been named Instructor Emeritus and will continue to have input into the curriculum and teach workshops.
Not a lot of paint to make the magic
Steve giving a critique
Darren photobombing his painting
See- it wasn't all work! In the end, we had a blast, learned a lot, and met some new friends. Here are the stages of their work. Steve used black and white, while Darren went for limited color.
They make it look so easy!
Darren's progress
Darren Kingsley
Steve's progress
Steve Early

Article 0

$
0
0
This edited version of a guest blog by Instructor JaFang Lu originally appeared in her newsletter at  http://jafanglu.squarespace.com/newsletter/

During my recent summer workshops, I had to work with a number of very dedicated and talented artists.  Here, I am sharing some images, process and exercises that my students went through in the Form and Color Portrait Workshop I taught at Studio Incamminati, School for Contemporary Realist Art.
A student of mine happened to have a camera with her on the last day of the workshop and lent it to me.  I was able to snap some pictures.  I missed the opportunity to take photos of paintings/studies in progress and what students did earlier in the week, however, this turns out to be the only and most well photo-documented workshop that I've taught so far.  A fact that strangely surprised me.

Although photos rarely come close to representing the artwork and are sometimes even deceptive, the experience of writing about this workshop made me realize how helpful it can be to document the process with images. In looking through and selecting images for this post, I am surprised by how much I forget (and am reminded of that by seeing the images I took then).
 
Because images were taken on a point-shoot camera, shot under difficult lighting sometimes and by me, I only published photos that are clear and, believe me, I've eliminated many blurry and glarey photos with students' consent, so not everyone's work is represented here. This was a five-day workshop. It focused on structures of the head and utilization and calibration of value-color relationship to recreate the effect of light on form.  All exercises are designed to enhance students' understanding in these two areas.

Image 1
Image 2
  Image 3 - value shifts,
 plane changes
Part 1 - Form Study: Open and Closed Grisaille
Each day began with a lecture and demo on the topic/exercise that we would cover that day. Every new exercise built upon the concept obtained in the previous exercise/s.  Gradually from doing these studies, students understood the concepts I talked about - and showed in the demo - through their own hands-on experience. In form study, our focus was on:
  • Understanding basic structures of the head
  • Obtaining general proportions of the model/person
  • Using value relationship to recreate the sense of form
The demos above are 10-20 minutes of closed grisaille.  Image 1 and 2 show different stages in closed grisaille - from a simpler to more complex value system and resulting in the more three-dimensional form of the head in Image 2.  I then proceeded to talk about major planes of the head and how value shifts correspond to plane changes in Image 3.


Part 2 - Color Study: Limited vs. Full Palette and Cool vs Warm Light Effect

Once students have a better grasp of the structures of the head, we moved into color study. Initially we used a limited palette of 6 or 7 colors. Above is a demo I did of a model with a fair complexion under the warm light. When students became familiar with this palette, we moved into the full palette of around 22 colors. Students did 2 studies of the same model/pose, one under the warm light and one under a warm light with a cool colored filter. In this case, we used green. For this exercise, I had demoed directly on a student's canvas to save time. At the bottom of this newsletter, you will see images of my students' studies on this exercise. 


Part 3 - Bring it together

Usually, in a five-day workshop, I would do a 2-3 hour evening demo, where students can see how principles taught during the workshop can be incorporated in developing a painting. Above is the demo I did of Carol under the warm light. She has darker complexion than the model in the image shown in the previous exercise. In the demo, in addition to getting the basic proportions and structures as accurately as possible in the time allowed, I also wanted to show the model's complexion as well as the temperature of the lighting (warm).
Here are some of my students' studies of these three stages.

Closed Grisaille: From Simpler to More Complex Value Planes

2-Value.gif5-value-again.gif5-value.gif


Bryan-Simple.gifBryan-Complex.gif


Color Study:
Limited Palette Color Study


Jenn-Limited-Michael-Arnold.gifJenn-Limited.gif


Warm vs. Cool (Gel) Light Color Study


Bryan-Warm-Light-Sharon.gifBryan-Cool-Light-Sharon.gifBryan-Warm-Light-Mindy.gif
 Bryan-Cool-Light-Mindy.gifBryan-Warm-Light-Michael-Ar.gifBryan-Cool-Light-Michael-Ar.gif

Full Palette Painting

Images of 2 full palette paintings in earlier and later stage.

Bryan-Beignning-Dian-P.gifBryan-Later-Dian-P.gif
 Brayn-Beginning-Michael-Arn.gifBryan-Later-Michael-Arnold.gif

A demo duo . . .

$
0
0
by Wendy Wagner
Third-year Student

. . .or is it a dual demo?

Either way, workshop students and outsiders came together recently to watch a three-hour demo by artists / teachers Kerry Dunn and Darren Kingsley, as part of Kerry's Advanced Portrait Painting workshop.
Darren Kingsley (left) and Kerry Dunn (right)
 In speaking with the workshop participants (sadly, I was not one), people were excited by how the week was progressing.  In the event that you could not attend, I took photographs of each pose.

Kerry's evolution over the evening
Darren's start to finish
Keep in mind that these were only taken with my phone, so lighting depended on where I happened to be standing at the time. Kerry is a tall guy, so my angles varied,  as his easel was so high.

This school year I will continue to blog about my exploits as a third-year student. Please stay tuned.

Advanced Portrait Workshop - Kerry Dunn

$
0
0
by Lynn Snyder
Third-year Student

Recently, we wrapped up the summer season of workshops with Advanced Portrait Painting by Kerry Dunn assisted by Robin Frey. 

The steps we follow in the Advanced Fine Art Program at Studio Incamminati covered in the workshop are taught to third-year students during an entire year.  It's a great way to get a glimpse into what we do but at warp speed!  


The first two hours of class were spent watching Kerry and Robin demo. Then we get to our easels and apply what we watched them do. Below are step photos of Kerry and Robin's demos showcasing their approach to building a portrait.  What a great week...I can't wait  for full curriculum this fall!

Step Photos of Kerry's Demo


Step Photos of Robin's Demo


A day in the life of a third year student

$
0
0
by Wendy Wagner
Third-year Student

Welcome back, as you shadow me through level three.
Returned to see our names by this

I will continue to write about my days as a student in the Advanced Fine Art program. For continuity, I'm starting with my first Monday class, however because of the holiday, school has been in session for almost two weeks.
Today is Portrait day with Kerry Dunn, and we are eager to get to work.

8 am: Arrive at school early to relax before setting up.

9 am: We jump right in the a 20-minute pose. Kerry walks around and evaluates what we are doing, giving corrections. His advice is for us to consider the gesture, tip, and tilt of the head. This continues for most of the morning, until we are allowed one 40-minute pose, which takes us right up to lunch. With the longer pose, we are instructed to add a value for the light.

Here are examples from the class:

Examples from students

Examples from students

Noon: Lunch is taken outside to enjoy the fall sunlight. Today is a Kerry-thon for some of us who are also taking his evening class, so I use the rest of my lunchtime to make a latte run. I will need the energy!
Lunchtime pick-me-up

12:45 pm: Kerry sets up the model to do a four-pose demo. Below are some observations from each pose.

Pose 1: 
Starts out with large shape; Divides one area for head, one for neck. If he starts in with an angle, he takes through head to see where it intersects on other side.
Look back and forth quickly between painting and model - in doing this, an error will jump out.
He adds no features in this pose.

Pose 2:
Always compare parts to the whole. If you compare the nose to the mouth, they may work together, but not with the whole. This will throw off your likeness. If you find yourself getting stuck in one area, move on. You will see the problem clearer when you go back to it.

Kerry's Class Demo

Pose 3:
Kerry adds the light on the ball of the nose. This aids in evaluating the turn, tip and tilt of the head.

This is basically form painting, but using a generic flesh tone for the light masses. We are to mix up one tone to represent the middle value in light, and apply it thinly.  To make a lighter value, the paint is applied opaquely. A darker value is achieved by thinning, thus letting more grey ground show through.
He drops in the highlight.

Pose 4:
Continuing to model towards the light, then switching to shadow, he addresses the half tone by mixing blue/green into the flesh color. 
He also adds a touch of cad scarlet to the mixture to address the ruddy areas of the face, such as cheeks or an ear.

We end the class with our own 40-minute pose.

4-6 pm: We have two hours before the evening portrait class begins, so its time to eat dinner. After, I mosey in to level two to see the students who are working overtime, do some sketching, and check social media. Do you know that we are now on Instagram? Follow us! Studio_Incamminati.

6 pm: The evening portrait class begins. Anyone can sign up for an evening class but many students also take them also to get extra practice. This class has five students who are from the Advanced Fine Art program and six who are not. Reminiscent of a workshop, it's nice to mix it up with new people.

Kerry begins with a demo and explains how we will be using a limited palette for our one-night pose (to be detailed in a later post).

7 pm: We start working on our portrait

Students working in the evening Portrait Class
9 pm: Whew! Class is over for the day. In 12 hours, I'll be at my easel for Tuesday's class, so I gotta go.  See you soon!


Variety is the spice of art in Level Two

$
0
0
by Chris Brizzard
Second-year Student

Having gone through Level One, it seemed that the charcoal would never end. But now that we’re in Level Two, there is more variety and the classes are getting more interesting. Below I will give a brief description of our classes this term and show some demos that the instructors have done so far.
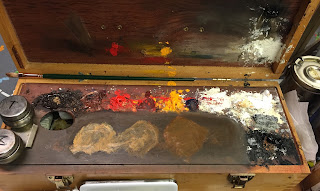
Mondays: Color Study

On Mondays, we have color study with Natalie Italiano and Katya Held. This is a continuation of color study from Level One, but in addition to painting boxes, they have now added simple organic objects, such as fruit, and cylindrical forms, such as tea kettles and vases, to the setups. The objective is to try and capture the overall effect of light falling on the forms. We are not to concern ourselves with reflected light or any subtle nuances of form at this point, just focusing on the large, abstract shapes. It’s a two-dimensional kind of thinking and showing form doesn’t really have a place at this point. We are supposed to do two color studies per day, and I’ve heard it takes doing hundreds to really get it under your belt. It feels to me like learning to ride a bike, and I’m still crashing regularly. Below are some demos from Natalie and Katya.


Tuesdays: Figure in Graphite

On Tuesdays, we have figure drawing in graphite with Robin Frey and Joseph Dolderer. We started the class doing one-minute to five-minute gestures, just like what we did in charcoal and paint last term. We have started getting into half-day drawings now, one in the morning and one in the afternoon. Graphite handles differently in that it is more linear and builds more slowly than charcoal or paint, which are both more mass-oriented. Graphite therefore requires more precision and it is good for getting very specific about the forms that you build. 

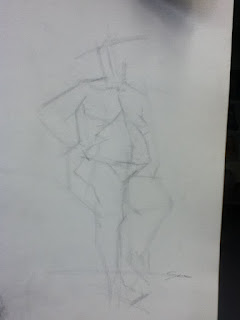
One thing that Joe continually stresses is the importance of placing the center-line in the figure. Doing this allows you to be in control when the figure shifts slightly from pose to pose (which is inevitable) and it also puts you in control of building your forms. Below are some short demos from Robin and Joe.

5-minute block-in from Joe

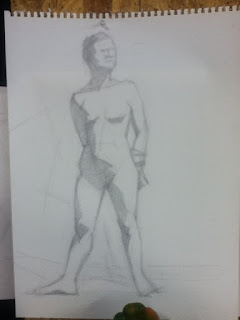
40-minute block-in from Joe

40-minute block-in from Robin
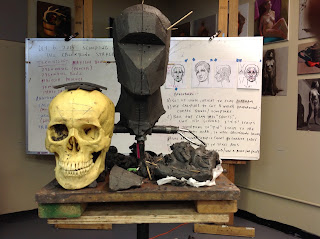
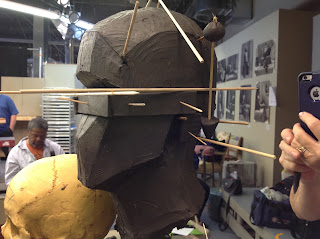
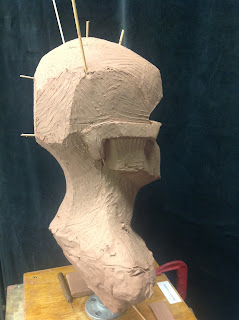

Wednesdays: Structure with Dan Thompson

On Wednesdays, we have our structure class with Dan Thompson. He really gets deep into it, and his course is fascinating. We started the course by drawing and dissecting the planes of a pepper as a way to get into a “structural” state of mind.


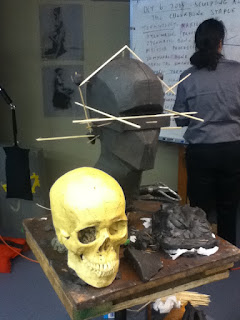
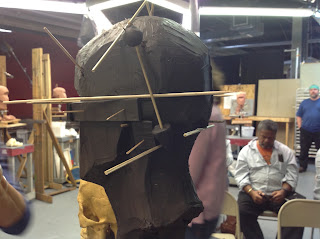
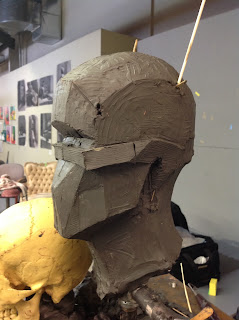
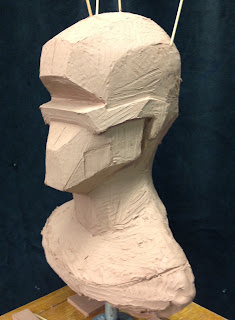
One of our major tasks in his class to build our own planar head from the ground up. We have now put our basic planes in place and will use this to add the features as the course progresses. We are continually referencing our constructions to the skull and always making sure the core landmarks of the head are symmetrical. A huge help to me personally was when we cut out the eye socket from the basic planar construction and then added the zygomatic arch (cheekbone) on top. I’m really enjoying how Dan breaks down the forms into logical chunks. I will never look at a head in the same way again.


Why are we spending so much time on structure, though? Focusing on structure alone will not give you much of a likeness, and it doesn’t look all that organic. The purpose, I think, is to ultimately be able to combine an optical way of seeing with one’s structural knowledge. In other words, structure is there to enhance what you see, and this is where you enter the realm of interpretation, of poetry. As Dan has said throughout the course, “The finer the relationships, the finer the art.”

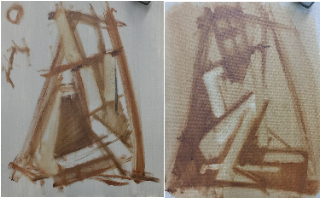
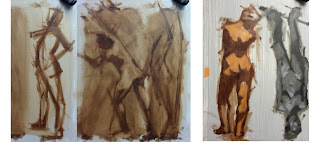
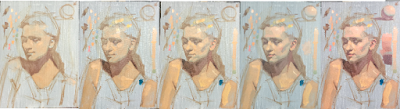
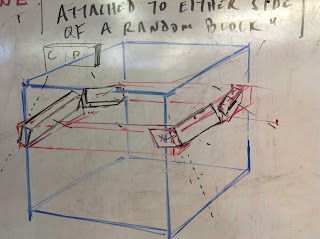
In his demo below, you can see this approach to the portrait in action. On the left side is his optical “interpretation” of the model. On the right, he has simplified the pose into a box with its relevant planes. The progression of this demo is important to note. First he started on the left side with a purely optical approach for 10 minutes or so. Then he stopped and went to the right side and built the box/planar construction for another 10. Then he went to the optical side and incorporated some of the planar information back into the painting. So we can see that the structural information is ultimately used to inform the optical, and that this is where the “poetry” emerges from, in the merging of the optical and the structural.
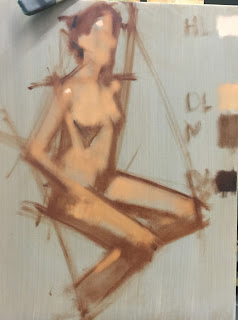
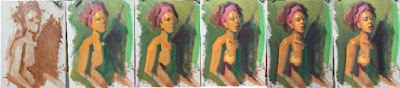
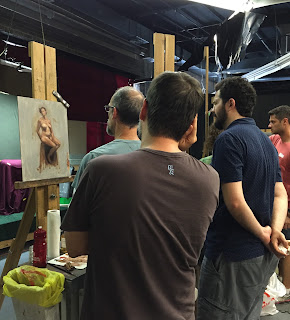
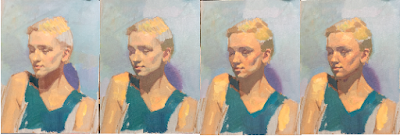
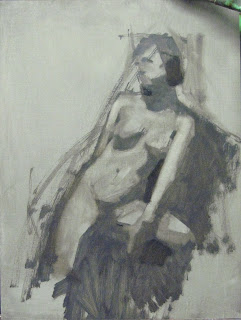
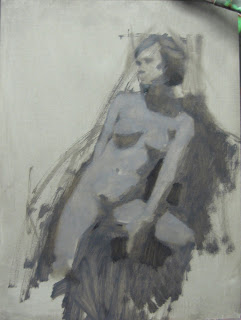
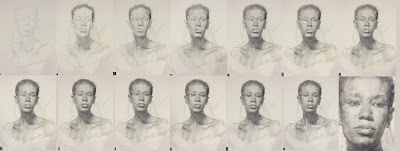


Thursdays: Figure in Black and White

On Thursdays, we have figure painting in black and white with Darren Kingsley. The focus of this class is on portraying the forms of the figure. At this point, we are doing lots of 40-minute poses, but will we be getting into multi-day poses by the end of the course. One of the most important things I have gotten from this class has been from watching Darren’s demos, especially when he told us that it doesn’t have to be "correct" from the beginning. In fact, you don’t want it to be correct from the beginning, because you’ll have nothing to work with and develop in a long pose. This somehow relieved some kind of anxiety in me, the anxiety that “it has to be right from the start.” I’m not sure where this came from, but I think many students feel it. With this awareness in mind, I am really enjoying building the figure starting with a strong, loose gesture (the whole point of Level One) and then having the time to start putting in bony landmarks and basic anatomy. As Darren has said,  the beginning stages are when you are “collecting information” about what you see. Below is a short sequence from one of Darren’s demos that illustrates how loosely one can start and then begin to  refine and add information as the pose progresses. (Note: This is only the beginning phases of the painting.)


Fridays: More figure painting and cast drawing

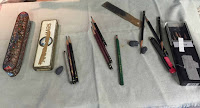
On Fridays, our day is divided in two. In the mornings, we continue the figure in black and white from Thursday’s class with Peter Kelsey, and in the afternoons we work on a semester-long cast drawing in graphite with Darren Kingsley.

For the cast drawing, you really have to change gears and slow down because it takes the entire semester to finish. We were able to choose from casts of the eye, ear, nose or mouth and each of us has the cast hanging in a dedicated booth that we can use throughout the term. When it is finished, Darren has told us that you shouldn’t be able to tell who did the drawing - no personal style should show because the goal is to make the drawing look exactly like the cast, period. A tall order, indeed.

We work on thick four-ply Bristol paper and use soft pencils in the beginning to block in the drawing. Below are some pictures of Darren’s demos up to this point, about six weeks in.


Overall, the variety of Level Two has been very enjoyable so far, but many challenges still lie ahead. It’s good to feel growth though, even ever so slightly.


The Planar Head with Dan Thompson

$
0
0
by Michela Mansuino
Third-year Student

It's 6:45 a.m. Wednesday and I'm radiantly happy as I climb out of bed realizing that Dan Thompson is probably, at this very minute, already driving down from New York to teach his now notoriously famous class at Studio Incamminati - THE PLANAR HEAD IN CLAY

I don't know how he does it, driving down to Philly, a three-hour trip, teaching for seven hours at Studio Incamminati, and then driving all the way back to New York - 13 hours of non stop energy... I find myself saying a prayer under my breath that he is okay as I drink my coffee and get ready to be the monitor for the class. 

We begin with a homemade armature and around 30 lbs. of Chavant Professional Plastelline.


For future heads, I make a detailed study of the Home Depot parts and other materials needed to make the armature.

We start by going to our armature and begin massing in clay, the “light bulb” shape, thinking about the carrying angle of the head and how the pole of the armature will be offset by it.
The size of the ball and egg shape is calculated to be a bit bigger than the skull we are working from, which is life size, so as to have room to make the planes a little exaggerated. We exaggerate them in order to learn from them.
                                                                   Our skull


Dan Thompson lectures on the mother planes of the head, following drawings by John H. Vanderpoel, in his book "The Human Figure."


From these Vanderpoel drawings, Dan instructs us where to make our first cuts on the mass of clay we have shaped on our armatures.

These diagrams are a decoded version of the planar head, step by step. This is where we start.


Dan models the mother planes in this manner:


Once we have accomplished this on our sculptures, Dan moves on to demonstrate the carving out of the tilt line - he uses a "dough cutter" to make the cuts. He recalls where he found the thing, having thought it had looked like an amputation tool from the Civil War. If you see a painting of a nude in the background, that's Kathleen Moore's black and white form study from another class, hanging on the wall. We surround ourselves with our best work so that we may learn from each other.

Intermittently, between carving the planes of the planar head in clay, we draw and paint from the model. We have done two other exercises to further re-enforce our structural understanding  of the planar head.  These are:
1. Drawing the head two ways, side by side, one intuitively and the other structurally.

2). Painting the head two ways, side by side, one intuitively and the other structurally.


After a what seems to be five minutes, the day is over and I look forward to next Wednesday.  I'm worried Dan has a long trip home still. It's all going to be alright, so look for my blog on Dan Thompson next month for the continuation of the planar head in clay.  We will be carving and attaching the staple of the jaw that is the cheekbone, and the ear.

Yours Truly, Michela


Follow me through Level 3

$
0
0
by Wendy Wagner
Level Three

Welcome to Tuesday in Level Three.

Figure Painting One is a two-day class. On Tuesdays, we study under Lea Colie Wight. On Thursdays, we work on the same pose under Jafang Lu.

Tuesdays are a bit groggy because I have the portrait marathon on Mondays but I'll do my best.  
Tip: Do not volunteer to monitor a class the day after you take an evening class.

7:50 am I walk in to see the coffee pot started and am glad it is not my morning to set up the model stands. Instead I chat with fellow students as we lament about needing caffeine.
Coffee brewing

8:30 am Set up palette for the day ahead.

9 am We are finishing a 6 day exercise. We spent two days on a value study, one on a color study and three on full color. To make it "simpler," the instructors decided to have us crop a small area. Sounds easy enough, right? We start the first 20 minutes of the day with gestures to warm up.

9:30 am After speaking to a student, Lea decides to demo on his painting. Since this is the last day, we are to turn form by paying close attention to the colors between light and shadow.
I took two and a half pages of notes. One of the things I like about Lea is that, besides giving great technical advice, she also gives tips on how to deal with learning the process.
Lea giving advice

11am  We start back on our own canvases with a fresh perspective.

Noon 
Lunchtime. Level Three's are discussing our progress with "Mentorship Fridays." Some of us are at the Philadelphia Museum of Art making a master copy (as am I during this cycle), some us are in the studio painting alongside an artist, and some of us are copying a Nelson Shanks painting. This rotates periodically and we have just received our assignments for the next round. All in different directions, we share tips.

12:30 pm A few of us are still tired so we make a latte run
Works in progress

12:45 pm The final three hours of the pose. It feels like we make one step forward, two back. Lea assures us that this is normal.
This is the pinnacle of combining all the aspects we have been learning these past two years - there are no specific rules because each pose and set up is different, with it's own unique light conditions. It IS hard.

3:45 pm Whew! Day is over.

Here are shots of our final pieces.
Close-up exercise
Close-up exercise

The Cheekbone Staple

$
0
0
by Michela Mansuino
Level Three Student


The Cheekbone Staple is the next step in building the planar head. We set up a skull so that it has a vertical face, like the one pictured. Instructor Dan Thompson has us work with the skull directly in front of us so that we can rely on it for measurements and further aesthetic comparisons.

We roll out clay into thin slabs the size of a napkin and cut these into 1 by 5-inch strips. You can see these on top of Dan's skull in the photo below. Dan used toothpicks to pin strips to the side of the clay head to make the cheekbone blocks. We used additional clay strips in front to connect sides. The tiny block below the jaw stands for the mastoid process.


It is important that the cheekbone "strips" start to emerge around the auditory meatus which is one of twopassages in theear.


The cheekbone is the widest part of the face, to get the widest point we must cut and rotate the side strips.


Dan created a drawing on the board as a diagram to illustrate how these side strips get cut into two parts and then are rotated.One portion of these two blocks is catches more light and pitches upward. That is the part toward the front of the face.


After we had our "blocks" in place, we attached them  permanently and removed the toothpicks. Then, we thinned them down and modeled them in.


Here, I've pinned the strips to the sides of my planar clay head.

Below is a side view with the mastoid process also pinned down under the cheekbone, lining up just behind the location of the auditory meatus. Dan joined the two strips this way, where the cheekbone dives into the auditory meatus.


Here is a view of the front plane of the cheekbone staple in place and modeled into the planar clay head.

Here is a side view.


A back view, including the beginning of the mastoid process.


The zygomatic arch, or cheekbone, lines up with the helix of the ear, it is an astonishing relationship, according to Dan. We see it clearly in Bernini's terracotta head of "St. Jerome."


The next steps in building the planar head are the ear, nose and mouth.


Beginning to see the light

$
0
0
by Chris Brizzard
Level Two Student

After about 20 weeks of practicing open grisaille figure painting, our level has now entered a new stage - adding the light. This is a pretty big deal, as I think most of us have been waiting a long time for this. Last week, our instructor, Darren Kingsley, did a demo and walked us through the initial process. Our poses for this stage start at an hour each, and we are to divide that time in half: 50% for the grisaille and 50% for adding the light. As this is a black-and-white painting class, we are still using our mixture of two parts Ivory Black to one part Burnt Umber for the darks. You can see how Darren has laid out his palette below: (Note how thin his mixture for the darks is.)


Even though this is an exciting new phase for us, there are several caveats Darren reminded us about:

  • Don’t get caught up in smaller shapes and sub-forms. It is still critical to check the overall proportions and gesture and to make the big shapes as good as possible, not more complicated. Believe it or not, this is the most important stage of all because it sets the foundation for everything to come. As such, Darren told us that he is consciously not over-drawing in this phase, but rather keeping it strong and simple as much as possible.

  • Don’t let the legs fall behind the rest of the figure. This is a common mistake as we tend to focus more on developing the torso or other areas, like the head. All parts of the figure need to be developed together.

  • Keep your paint mixes thin. This applies to both the dark and light mixtures. We are working on the principle of “fat over lean” in oil painting, so it is important that the initial layers of paint be thin so that subsequent layers can be added on top. And “thin” does not mean adding turp to your mixture either. It should be dry and thin, not wet and thin. It may be helpful to wipe off any excess paint from your brush with a paper towel before applying it to the canvas to keep the paint application on the thin side. 

The mixture for both the darks and lights is thin on the palette.

  • Don’t create a third value where the light and dark shapes meet. This is important because the goal for this phase of the painting is to create a figure that has been divided into flat value shapes of light and dark. In addition, there should be no sharp edges where the light and dark shapes meet. We are still pushing the shapes around in this phase, adjusting the gesture and proportions of both the light and dark shapes to get the figure more and more accurate - not more complicated.

Even though we have moved into an exciting new phase of figure painting, it is not a miracle cure or anything. If the gesture doesn’t work and the proportions are off, no amount of adding light is going to fix that. So we still must focus on the basic principles that we have been practicing from the beginning and that can be summed in Studio Incamminati's motto: STAND BACK AND SQUINT!

Day Three in Level Three

$
0
0
by Wendy Wagner
Level Three student.

Wednesday is a nice break in our week. It is a combined class of Levels Two and Three for Dan Thompson's structural drawing fundamentals. Since Dan commutes from New York, class starts 15 minutes later than our other days.

Today, he is doing an all-day drawing demo. We have completed two months of sculpting the head, feature by feature, and Dan will demonstrate how to incorporate the 3D thinking into our drawings.

7:55 am Arriving early on a frosty morning, students hang in the kitchen, discussing current work.

9:15 am Class begins. Dan explains that this is a visual example of our upcoming long pose, which will start next week. Using a 2H pencil, Dan's hand glides loosely across the page. I notice that he is using the techniques we have been taught all along: Use your whole arm to draw, stand back often, and move your eyes back and forth from the model to page. 
Tools of the trade

9:35 am Model break. Students line up to take pictures of the progress.

9:40 am Pose continues. We are allowed to ask questions as he is drawing. We take notes, photographs of the evolution, and ask away. Dan stays with the 2H pencil for some time, blocking in with an assemblage of shapes, angles and lines. This gives him the freedom to move and revise as the model settles into the pose. Space prohibits me from sharing my pose-by-pose notes, which were taken extensively for the rest of the morning.

Dan answering questions
At some point, he began alternating between a 2H, an HB, and for his darkest notes, a 9XXB. Dan explains that it is a tug of war - you want a certain richness. We watch him achieve this by lightly stumping in shadow shapes, drawing, and erasing out highlights. I love his markmaking.

Noon Lunchtime. In a reversal from the morning, it is a unusually warm day, so take-out it is!

12:45 pm Class resumes. Knowing that he has limited time to complete this, Dan continues his magic by moving from larger forms to smaller ones. He does not stay in one area for long, as he is constantly comparing smaller areas to the whole. This is where the knowledge of structure comes into play. Perception is great, but if you have an understanding of the planes, and the structure underneath, it will aid in your decision-making.

4:00 pm Time is up. The end result is an exquisite arrangement of shapes, values and hatchmarks in Dan's distinctive style. What a treat!  See his progress below.


Here are the step-by-step pics.
Photos taken each model break

Did you know that Studio Incamminati is on Insta? Follow us!
https://www.instagram.com/studio_incamminati/

Tha Planar Head with Dan Thompson: The Ear as a Structural Door

$
0
0
by Michela Mansuino
Level Three student


The most underrated form on the head and one that gets far too little attention in most portraits is the human ear. It could be thought of as a door - with a beach ball holding it open. The concha (inner ear) being an immense, concave ball. In surer terms, the ear could be thought of as a rotated, extended panel on the lateral plane of the head.


We started our adventure into the modeling the human ear by rolling out two slabs of clay into rectangles approximately the size of what the nose should be. The slab should be a little thick, something you can remove clay from.
We lined the panels on our sculptures and attached them, lining them up with the cheekbone staple we had modeled the week before. We compared it to our skull.

Once the panels were in place, we scooped out a bit in the center, like a giant sink, and gave it depth, then we added clay to the back. Here Dan demonstrates the depth of the "sink" in a giant ear.


In the back we added clay.


For the helix, we rolled out a big coil and kept it thick, but the coil also had a flat part. The coil then went around and dove into the concha, just as the Lincoln Tunnel dives into Manhattan.


Here I have the "doors" on my planar head in place and with the "sink" pushed in.


Here I have the coil of the helix in place and diving into the concha.


A diagram of how the shapes should be thought of conceptually.


The concept abstract.


The giant ear Dan built to demonstrate the concept.


Sculpting the forms from observation and focusing on depth. Here is Dan's planar head with the ear in place.


Notice how the tragus and antitragus are twin forms. The tragus is a form that could be thought of as two twisting cones according to Dan.


Here you can see the twisting cones of the tragus in an anatomy book.


From now on I will expect to see more refined ear and cheekbone shapes in the portraits I paint.


Nelson Shanks painted beautiful ears in his many portraits, like this one, which is extremely revealing for the subject. (Detail of the portrait of Pope Paul the II, by Nelson Shanks)

Look out for my next blog on the Planar Head on "The Nose"

Dan Thompson, The Planar Head, Modeling The Nose in Clay

$
0
0
by Michela Mansuino
Level Three student

One of the most beautiful drawings of the nose, and something many artists aspire to, is that of Stephen Rogers Peck, from his "Atlas of Human Anatomy." After modeling this in clay and drawing it from life, I think about the nose in a very different way. I see it structurally in my mind's eye and see it organically in front of me. And, it's all thanks to our instructor, Dan Thompson.

To help us, Dan started with a giant nose. This has a straight mast in the center, representing the columella.

To this structure, then, two strips of clay are added, representing the wings of the nostrils - the alar. Dan uses toothpicks to hold it all in place.

Two more strips are added, representing the alar cartilage.


Four small cones are added, filling the negative spaces in between these strips.

Dan demonstrates the attachments one more time on his planar head. He starts by adding clay around the base of the nose like this:


He works the clay into place, making a platform on which the nose will be built.

On top of this shaped platform, Dan adds a slab of clay, a triangular wedge, which represents the "mast" of the nose, or the columella.

To the mast, then, Dan adds the two strips of clay that represent the wings of the nostrils.

Emanating from the tear duct, traveling down the length of the nose and tucking under the wings, are the two strips representing the alar cartilage. Notice how these strips start by twisting and then meet at the tip of the nose before they dive under the wings.

The negative spaces are then filled with four small cones.

This what my own planar head looked like when I attached the slab  representing the mast of the nose.

When I added the strips representing the wings and the alar or wing, I had attached them too low. See here how Dan corrected my attachment on the right, making the wing much higher in relation to the tip of the nose, where the alar meets in front and creates the "ball" of the nose.

I also started to attach the "sling of the muzzle. This is a thin strip of clay going on either side of the face, starting at the tear duct and wrapping around and under the jaw, making "the canopy of the jaw."


 Thanks to Dan Thompson, I know I see the nose much better now.


Day Four in Level Three of the Advanced Fine Art Program

$
0
0
by Wendy Wagner
Level Three student

Advancing through the semester, welcome to Thursday's class - though, it is actually taught twice weekly. On Tuesdays, we are led by Lea Colie Wight, on Thursdays, our instructor is JaFang Lu.

Disclaimer: Let me start by saying this is not a biased post. Before enrolling as a full-time student, I took charcoal drawing with JaFang through the school's Continuing Education program, and loved it. She is an amazing teacher, and one day a week was not enough. Flash forward a few years, and now I attend full time.

8:00 a.m. It's cold  in Philadelphia. The thermometer reads 29 degrees, as I arrive at school.
This is my view (sans model)

8:30 a.m. Today is my day to monitor the class, so I set up the model stand with help from classmate Kathleen Moore. Since our class has 12 students, we have two models. It's wonderful to have lots of space around the model stand.

9:00 a.m. Class begins with a warm-up gestures consisting of four five-minute poses.

9:26 a.m. We are on day three of this seven-day pose. What I appreciate about this class is that the instructor adjust it based on individual needs.

In other words, it is not a one-size-fits-all approach. Students are working on individual weaknesses, at the same time. The teachers guide us based on how we are progressing. If you need more time in a particular area, you take the time to work it out.

At times, they will demo on our work. Other times they make a small color note. Or maybe they will paint alongside us, calling the class to watch when necessary. Whatever it takes to forge ahead.

JaFang has this wonderful ability to show you how little you know. You may think you have pushed your color relationships, and she will come by, adjust a note to show you how it could really be. Sigh.

3:45 p.m. Class is over.

I snapped some pics so you can see how we are advancing. We have four days left to build the final painting. Taken with my iPhone, they are not in the best light, but you get the idea.
Progress of Level Three students

Did you know Studio Incamminati is now on Instagram? Follow us!
https://www.instagram.com/studio_incamminati/

Lea Colie Wight Demo

$
0
0
by Lynn Snyder
Level Three Student

Lea Colie Wight demoed over the course of several sessions to Level Three students in the figure painting class. I thought I would share the process.  

Lea pointed out the first tool to utilize is stepping back. It is the most unused habit and crucial for detecting errors. The second tool is working all around the canvas, which blocks you from seeing the whole picture.  

It was wonderful to see her work and the class learned a lot from watching her process. Hope you enjoy the photos as much as we enjoyed her demo. Please note, each photo was taken after a 20-minute painting session.


Mentoring Level Three

$
0
0
by Wendy Wagner
Level Three Student

Friday's in Level three are my favorite. I hate to pick one day over another, because I learn a lot in each, but the concept of Mentorship is a program component which excites me.

We rotate seven-week cycles, which consist of:
  • One rotation making a museum copy at the Philadelphia Museum of Art
  • Two rotations of working on a personal still life alongside a teacher or fellow
  • One rotation copying a Nelson Shanks painting

Usually in the sixth week of each cycle, we all gather and walk from space to space to see how each student's piece is developing, discussing the challenges we have faced. This gives us one more week to make adjustments based on feedback received.
Today, you will shadow such a day.

8:30 a.m. I arrive at school on a 19-degree day to continue on my Nelson copy.
Instructor Robin Frey paints alongside us in the studio, working on her own piece. She dispenses advice as needed to move us along. Students Lynn Snyder and Linda Dennin are there as well.

12:15 p.m. We meet in Instructor Peter Kelsey's studio to see the progress of David Clark.
Then, we enter teacher Natalie Italiano's space to see the work of Tom Plassa. Next door is Paul Worley, who discusses his approach while working under Fellow Shira Friedman.
Students working on personal still life paintings
We then travel to the Mentorship room, where four original Nelson Shanks paintings hang. Lynn, Linda and I speak of our experiences copying the work of our school founder, an inspiration to all of us.
Students copying a Nelson Shanks original
After that, we visit our lecture space to see what Kathleen Moore and Angelique Benrahou were working on at the Philadelphia Museum of Art.
Student copies from the Philadelphia Museum of Art
Finally we enter the studio of Instructor Alisyn Blake, to see the development of student Michela Mansuino's painting.
Original student still life
By 2:00 pm, we head back to our easels to continue.
Another day in the life of a Level Three student.


Did you know Studio Incamminati is now on Instagram? Follow us!
https://www.instagram.com/studio_incamminati/

Modeling the Mouth in Plasteline, a Structural Analysis with Instructor Dan Thompson

$
0
0

by Michela Mansuino
Level Three student

Let's start with the muzzle, which is a platform for the mouth. The muzzle starts at the tear duct, called the infraorbital furrow. It descends upon the associated substructures, the cheek pad fat, the masseter muscle (a muscle that runs through the rear part of the cheek from the temporal bone to the lower jaw on each side and closes the jaw in chewing), then down and over the submental triangle at the bottom, below the chin. 

These drawings illustrate the artistic form of the muzzle.


Modeling the muzzle was attaching a thin strip of clay in a sling-like manner.


Once the muzzle sling was in place, we turned to a giant mouth Dan had modeled for us.  The toothpicks indicate the direction of the planes.

Notice the nodes, they are sizeable. They have a quality that point upwards, and give the face a pleasant look.


To make the mouth on our planar head, we started with the nodes. We attached them first, like two buttons, halfway between the bottom of the chin and the top of the philtrum, (the vertical groove between the base of the nose and the border of the upper lip). Then we dug out the sulcus for depth.


Here is how mine started, with the nodes and tubercles in place. And that dip is the beginning of the sulcus, which I then dug out much deeper.


Next, we dug deeply right next to the nodes, to create the corners of the mouth.


Here is a profile of it.


Here is a detail of it. I didn't like mine, I thought I should have made the wings of the lips much thicker.


Dan's was beautiful.  He always makes his aesthetically pleasing.


The most striking concept was that of the "Y" making the "shield" shape in the center of the upper lip.  Dan drew this out for us in de-coded form. When you think of the structure in this way, you leave out lines around the apex of the upper lip, and you model the form, whether in clay or in paint.


Under the sulcus, we added the mentalis muscle, like a large button in the center, under the bottom lip, and the tubercles, marking the width of the ramus in front.  Let's take another look at Dan's giant mouth.


Painting a mouth will never be the same again.  Now we have a sound concept working from the live model. Dan was very persuasive when he said that first you had to have the center of the mouth marked, then the wings and pillows of the form would be worked out in perspective from there. Great advice, now to put it in practice.


The Women of Studio Incamminati

$
0
0
by Wendy Wagner
Level Three student

March has been Women's History month. In light of this, I thought I would highlight the women of Incamminati.

As a female, I look up to the instructors as examples of where my own career can go. I asked some of them about the women to whom they look for inspiration.
I did not give parameters, because, as you know, inspiration can come from anywhere - from someone's work, words, or examples. It does not mean one who paints as you do. And, of course, your taste may change with whatever phase you are in at the time.

Instructor Lea Colie Wight listed women such as Rosa Bonheur, and generally all the work by Helene Schjerfbeck, contemporary painters Kouta Sasai, and our own Jafang Lu. She added Cecelia Beaux, and Mary Cassatt from her earlier days.
To view Lea's work, go to http://leawight.com/
Examples of Lea's Inspiration
Instructor Robin Frey cited Florida artist Nike Parton, who taught her the importance of painting every day and following your heart.
Her website is: http://www.robinfrey.com/

Fellow, and recent SI grad Shira Friedman mentioned influences such as Cecelia Beaux, Kathe Kollwitz, Elizabeth Eakins, Mary Cassatt and Minerva Chapman.
To view Shira's work, go to: http://www.shirafriedman.com/
Examples of Shira's Inspiration
Instructor Natalie Italiano mentioned that early on Cecelia Beaux was an inspiration, but currently she is enjoying the work of Margaret Bowland.
Natalie's page is http://natalieitaliano.com/

To learn about the work of our other female instructors and fellows, click on the links below.

Instructor Alisyn Blake http://www.studioincamminati.org/galleries/faculty/item/143-alisyn-blake
Instructor Katya Held http://www.katyagallery.com/
School co-founder/Instructor Leona Shanks: http://www.leonashanks.com/


Did you know that Studio Incamminati is now on Insta? Follow us!
https://www.instagram.com/studio_incamminati/


Viewing all 103 articles
Browse latest View live